Tuesday, November 29, 2011

Exposure Bracketing: The Best Thing Since Sliced Bread!


You are going to love this tip! I stumbled across exposure bracketing as I was doing my usual research and was blown away by the awesomeness of this feature. Yes I said awesomeness!  It was definitely something I wished I had discovered  sooner.


Exposure bracketing is also referred to as a AEB (automatic exposure bracketing) it allows you to take a series of shots at different exposure levels to increase the odds of achieving the best exposure for your image.  What you'll end up with are three or more photos, (depending on the camera) one that is underexposed, another that's overexposed and one taken at the optimal exposure level. These are your bracketed exposures. Most of today's higher end DSLR cameras carry this feature. My Nikon D 40x doesn't, so I've enlisted the help of my big boy the Canon EOS 60D. This is where you grab the manual for your particular camera, dust it off and read about how to access its AEB settings. Exposure bracketing can also be done manually by setting your aperture, ISO and shutter speed combinations then taking a series of shots at different exposure compensation levels both positive and negative. Compare the shots and chose the one with the exposure that best meets your needs.


AEB is measured in stops. This image shows a setting of three stops: -3 stops and +3 stops


This is what's so great about it, AEB is best used under difficult lighting situations. In settings where there is too much light or insufficient light, the camera is sometimes tricked into either over exposing or under exposing a shot. Exposure bracketing is your insurance policy to make sure that in those situations you have a workable and properly exposed photo. So the best time to use AEB is when you feel the setting poses a challenge for example shooting a scene that has snow, a full sun day, shooting a sunset or when you have to quickly shoot a scene and you don't have time manually select the correct exposure. It's a great tool for amateur photographers in this regard. So, now do you see why I was so excited? Of course the first thing I did after reading about AEB was to grab my camera and check it out. I couldn't wait to see how the results. Here are examples of photos I took indoors under low light conditions and at different exposure levels.


What the camera believes to be the correct exposure for the setting

Underexposed -1 stop 

Overexposed +1 stop. This is the exposure level I would choose.


What the camera believes to be the correct exposure for the setting
Underexposed -3 stops

Overexposed +3 stops

As you increase exposure bracketing, each stop has more of an impact than the one before. You may also choose to use 1/3stop or 1/2 stop than full stops. Notice that my choice of exposure was the overexposed shot in the first series of shots. Choice of exposure will vary because it is based on your specific preference.


  • You will first have to choose your shooting mode: Exposure bracketing doesn't work in manual mode, you will have to select either aperture priority or shutter priority mode. If you're in shutter priority mode the camera will change the aperture to be sure to get the correct exposure and if you're in aperture priority mode and the camera will change the shutter speed. Make sure when choosing your shooting mode that if aperture is a priority in that particular shot, use aperture priority mode and if shutter speed is a priority then you should choose shutter priority mode. You can also shoot in program mode but it doesn't give you as much control over the outcome of your shot. 
  • Next, decide how much of a variation you would like for your photo. If you would like a slight variation, chose a 1/2 stop or 1 stop. For more variation, chose a 2 stop or 3 stop bracket.
  • Now you're good to go! You can now set up your shooting mode to take a sigle picture as you press the shutter release button, or you can choose continuous shooting. Ready? Ok! Get ready to press the shutter release button. If your camera's on single shooting mode, you'll have to press the shutter release button three times to get the three exposures. In continuous mode, press and hold down the shutter release button and the camera will take the three bracketed exposure shots in succession. 
Please note: Flash cannot be used when exposure bracketing has been selected. 

So there you have it, a short and sweet introductory tutorial on automatic exposure bracketing. Don't wait around, get out there and check it out!  

Friday, November 25, 2011

6 Composition Tips To Try Today!

Composition...sounds simple enough right? Well, it will be as soon as you're done reading this tutorial! So let's get going. I'm sure you've looked at a picture before and felt that something just wasn't right. Maybe it was a bit off balance or there wasn't a particular area of interest that caught your eye. That's where composition comes into play. It's a basic concept, but one that will undoubtedly add definition to your photos. Here are 6 composition tips that really worked for me and changed the quality of my photos.


This rule is the who's who of composition I guess you could say because we can't talk about composition without mentioning this concept. It's based on the premise that the eyes are naturally drawn towards particular areas of an image and uses a 3x3 grid (looks like a Tic Tac Toe board) as a guide as to position the subject of our photo where it will catch the viewer's eye. Placing your subject on any of the intersecting points of the grid or along the vertical or horizontal lines will generate a more dynamic photo, one that draws your viewer's eyes to the main element of the photograph. Most DSLR cameras have a feature that allows you to use this grid when setting up your shot. I should tell you that your image doesn't have to be directly on the points or lines of the grid, just close enough to make an impact on the composition of the shot and that the rule of thirds is really more of a guide than a hard-and-fast rule. Feel free to break out the rebel in you and challenge this rule at any time. The pictures below are a visual of how utilizing this guide can improve the composition of your shots.


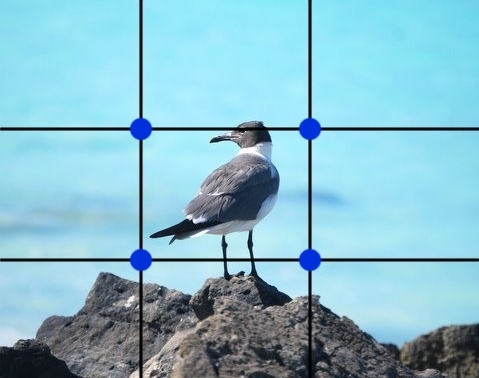
In this photo, I photographed the seagull at the center of the shot. It's an ok picture, but it doesn't tell a story and seems rather flat and stagnant.


Negative space is useful when photographing moving (or in this case soon to be moving) subjects. Leaving space to show the direction that they're moving in creates a better shot.
When shooting a single object, aligning it towards the bottom left corner of the frame will give your subject added focus in the photo. Multiple objects can be positioned towards the bottom right side for a similar effect.


Balance in a photo can be obtained by means of: symmetrical and asymmetrical balance. Wait!! Don't change the channel just yet! It's pretty easy to understand. Let's look at some photos to explain the concept.


The cars in the photo are evenly balanced showing symmetrical balance.
The buses are of different size yet, the smaller bus balances the larger bus in this photo.


A correctly balanced photo allows the viewer to take in the full story of the scene. Objects that are identical or similar are placed side by side to achieve symmetrical balance. Objects of different size are positioned on opposite sides.


Symmetrical Balance

Asymmetrical Balance is achieved here by the use of color and the balance of objects in the foreground, middle-ground and background.


Balance can also be obtained by color. In the photo above, the two red cars balance each other. Rich vibrant colors can also be balanced by muted or more neural tones, they don't have to be the same color or saturation. How dark or light a subject is also affects balance. When shooting a dark subject, placing it before a light background balances the shot. A light object on a dark background will have the same effect.


Radial balance is another simple aspect of balance. It is seen in objects where everything is assembled or radiates around a central point. Staircases, flowers, bicycle wheels etc. are a few examples of radial balance.
Radial Balance


There are three types of lines (sometimes referred to as leading lines) to experiment with when composing your shot: vertical, horizontal, curved and diagonal. They all add different effects to your photo, however diagonal lines tend to have a bolder effect. Lines can be used to pull the reader into and through a scene or to direct their eyes to the subject of your photo. Here are a few examples:


Horizontal lines draw the eyes into the scene.

Horizontal lines also have a calming effect.

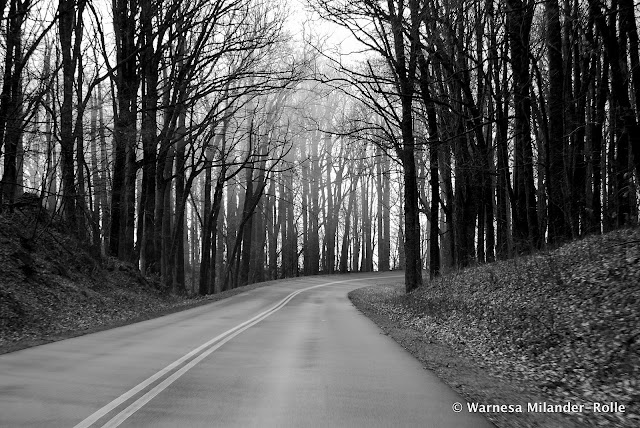
The roadway in this shot takes the eyes through the scene.
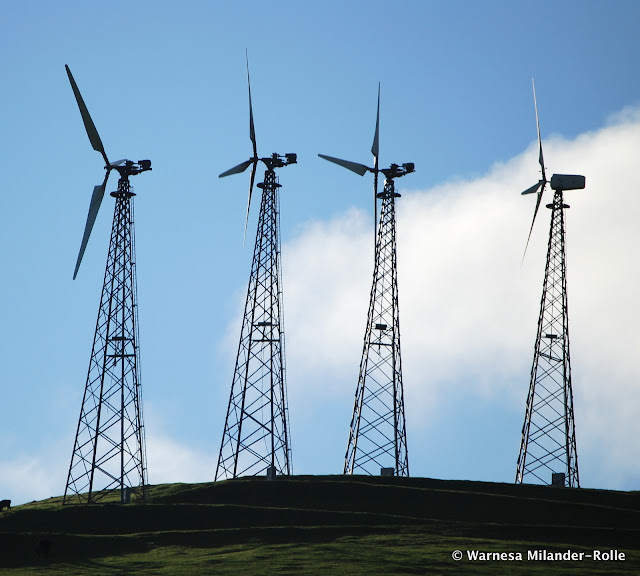
The vertical trees give the appearance of height and grandeur.

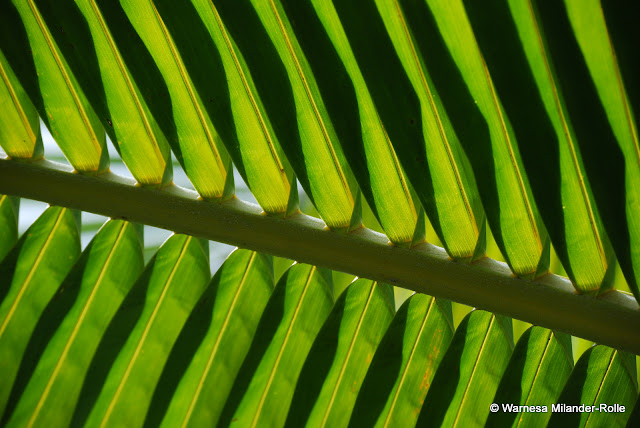
Vertical lines can also show growth.

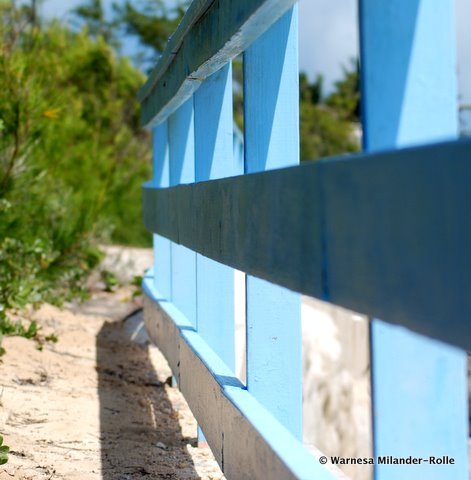
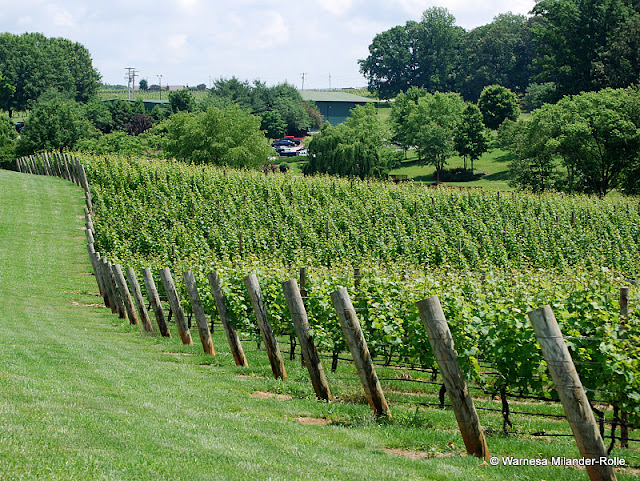
Diagonal lines give the appearance of motion and energy.

Graceful S-curve


As I write about this technique I can't help but think about Madonna's "Vogue" video where she frames her face with her hands. If you don't remember it, check out the video again. Framing in photography works a bit like that because it compels the eyes to focus in on the object being framed. Frames can pretty much be anything on the edges of your shot. It can completely surround the subject like a window, hole or archway, or it could be something that frames one or two...maybe three edges of your scene. Here are a few examples of framing. Let's see how they impact each photo.


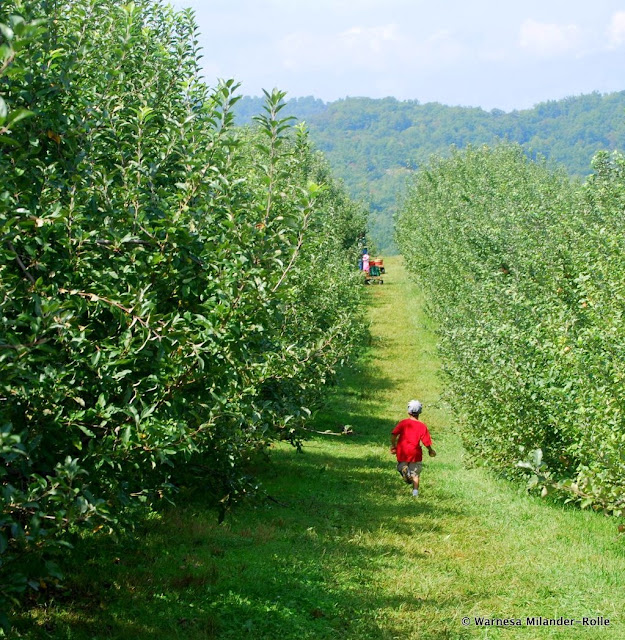
The framing of the trees on both sides of the photo draws attention to the subject and gives depth to the scene.


The window frames the subject giving it prominence in the photo.


Your eyes are drawn to the boat because of its framing.

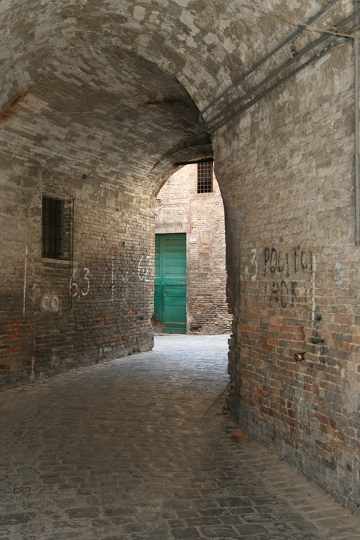
This arch provides a great frame for the green door 
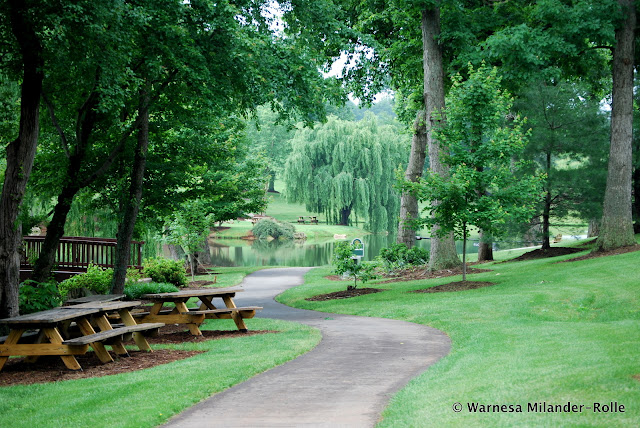
Trees provide a great frame for the lake scene here.


Windows, doorways, arches, holes, bridges, people, trees (you get the idea) can all be used to frame your photo.


Make sure that the subject you are framing is in focus and that it is exposed correctly.


As you look at the above photo, is there any doubt as to what the subject is? Before pressing that shutter release button, you have to make decisions each time as to what the subject of your photo is and    utilize techniques to make it stand out to the viewer. We've discussed a few of these already, framing, using lines and the rule of thirds, and now a few more to add to your camera bag of tricks!


In the photo above, I used a combination of the rule of thirds and depth of field. I'm sure you picked up on that. Great! Blurring the background removes unwanted distractions and places emphasis on your subject.


Your subject will have even more presence if you keep it simple by zeroing in on it and disregarding anything that takes away the impact of the shot. I love the simplicity of this shot and how the boat is center stage.


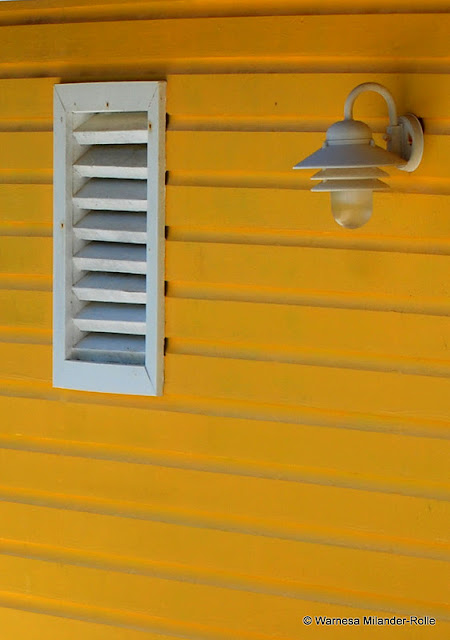
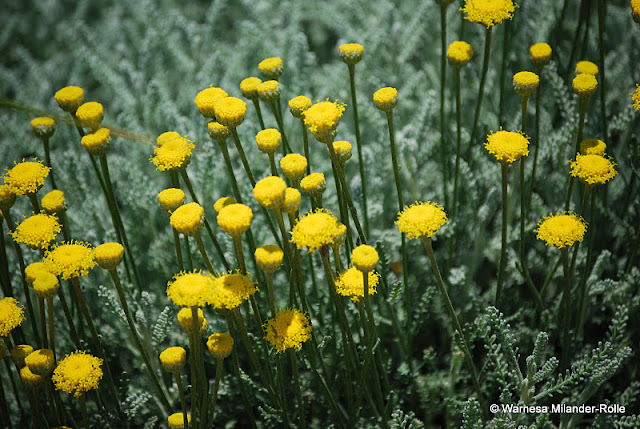
The use of color contrasts is another way to make your subject "pop" in a photo. Contrasts can be made with colors that are complimentary (like the photo above) as well as with contrasting colors ex. orange and red. Other contrasts between dark and light, new and old, soft and hard are also useful as well.


 Fill the frame with your subject. The viewer will have no choice but to pay attention to your point of interest.


To create depth in your shots, include elements in the foreground, middle ground, and background to give you a layered effect. Attempt to bring your foreground image closer to the lens and allow your background to fill out the background.


Photo editing software makes it easy to crop images you have already shot to obtain better composition in your photos. After doing research on this topic, I found myself reviewing older photos and cropping them based on these techniques. Not all photos will lend themselves to cropping, so remember these tips before you take that shot and you're on your way!


Friday, November 18, 2011

Sunny 16 Cheat Sheet


                                                                                                                                                            This is such a powerful tool for both amateur and professional photographers that I decided to dedicate a page solely to it. 


Sunny 16...you'll remember this tip not only because it has a cute name, but because it is your exposure sidekick; your backup when you don't have a digital light meter or your camera's light meter is not giving you the correct exposure for the shot. The key to using this rule is that it works only during daylight hours, but is effective to use with the different lighting conditions you may experience in a given day.


Here are the steps you'll need to follow to make it work for you.

First determine the available light you are working with. We'll start with the settings for a sunny day.

Next set your f-stop/f-number to f/16.


Make your shutter speed equal to your ISO. (When shooting in full sun an ISO of 100/200 is best.) If you choose an ISO of 100, then your equivalent shutter speed will be 1/125 (number closest to 100). If you choose an ISO of 200, then your shutter speed will be 1/250
             (number closest to 200.)

If you want to change the aperture to achieve a different effect in your photo, (blur the background or bring more of the shot in focus) then use the chart below to help you determine the aperture and shutter speed combo, but keep in mind your available light. You can also make the adjustments by remembering that whenever you move your aperture up, you have to move the shutter speed down the same number of stops to have a balanced exposure. Likewise, when you move your aperture down, you need to move your shutter speed up the same number of stops.

Let's put this into practice: It's a sunny day and you set your ISO to 100. You are shooting a landscape and want to bring everything into focus by using an aperture of f/22. Adjust your aperture to your starting point f/16 (remember sunny 16!) and move it up until you arrive at f/22 (count the number of stops you make as you go up the scale). Next, adjust your shutter speed by making the same number of stops down on the scale until you arrive at 1/50. This will give you a balanced exposure. Super easy!

The chart below is a guide for use under different lighting conditions during daylight hours. It uses a combination of aperture, shutter speed and ISO to estimate the correct exposure for the shot. This is a great chart to print and take with you.

Table contents courtesy of Guide to Film Photography


Remember:

1. Sunny 16 is just a guide, a starting point to help you achieve a balanced exposure. It will not produce perfect results every time. You may have to adjust exposure compensation if you feel the shot is over or under exposed.

2. There will be times when you may choose to underexpose or over expose a shot to achieve a particular artistic effect which is perfectly fine!


Wait! There's more!
Visit this site for a few other helpful rules for photographing in challenging situations: http://www.digital-photo-secrets.com